Specimen Collection (SPECIMEN COLLECTION)
Specimen collection is an important step for One of the most important steps in laboratory analysis.
Therefore, whether there is a good diagnostic tool Use modern technology or have an expert analyst
Whatever If the specimen is collected incorrectly or improperly, it will cause Resulting in the analysis result obtained
The error has no meaning because it does not reflect the abnormalities that occur in real patients as the doctor needs.
More than that, if the case The results of the analysis may lead to patients receiving incorrect treatment and may cause
Fatal danger
Specimen type
There are many types of specimens used in laboratory tests. May be divided as follows
- Blood
- Urine
- Stool
- Cerebrospinal fluid and water Penetrating from various parts of the body
- Other than those mentioned, such as purulent sputum, swab, vaginal smear to detect sperm
And acid-phosphatase etc.
Blood (BLOOD)
The blood sample used in the test may be in clotted blood, serum or plasma form to obtain the form.
Blood samples as needed And is to reduce the error in blood collection.
There are rubber stoppers, close the tubes in various colors. According to international standards Blood collection officers must choose the correct use.
Details about rubber stopper color Anticoagulant used And the types of applications in the laboratory can be found in the table.
No. 1 In addition, the blood collection in patients is only one time but there are many tests that require blood in the form of
Different order must be arranged (Order of draw). Entering the blood in the blood vessels with different color stopper. To reduce the effects of
Contamination of substances added into the blood vessels according to Previous, attach the needle that came into contact with the blood in the tube.
Additive carry over leads to incorrect diagnosis results. The order of blood selection in
Various color spigot tubes To draw a patient’s blood once, but there are many tests That uses different forms of blood
Blood collection techniques
- Draw blood from a vein (VENIPUNCTURE)
Indications are general methods that require large amounts of blood.
Table 1. Shows the color of blood vessels, anticoagulants used and the type of use in the laboratory
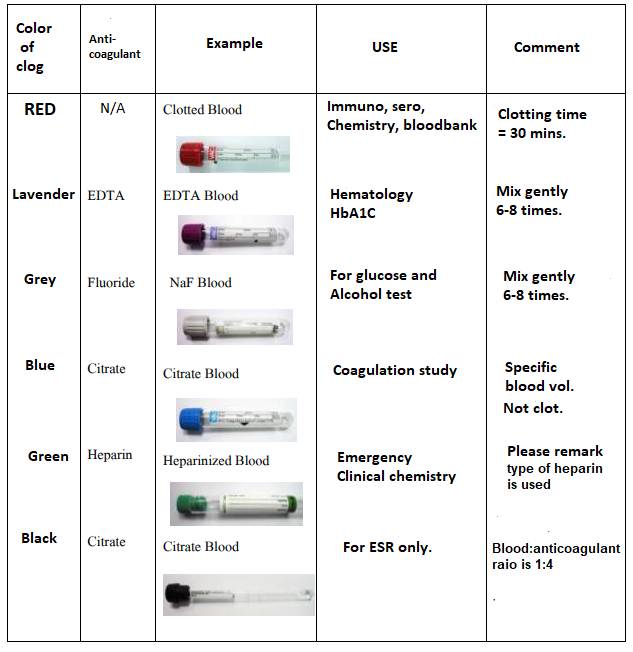
The order of blood supply to the blood vessels (color of the stopper) in different types of puncture in both systems using syringes and vacuum tubes
No. 1 bottle for culture media Blood culture (In the case of wanting to send a Hemoculture examination)
No. 2 blood vessels containing sodium citrate (blue stopper)
No. 3 Clotted Blood (red stopper)
No. 4 blood vessels containing heparin (green cork).
No. 5 blood vessels with EDTA (lavender stopper)
No. 6 blood vessels containing sodium fluoride (gray stopper)
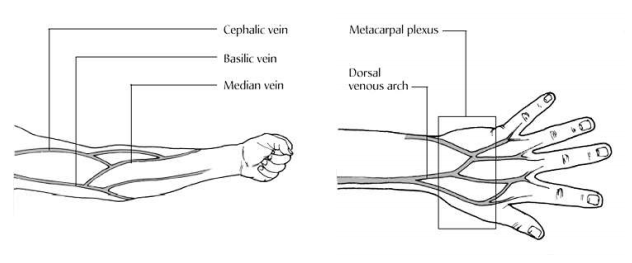
Suitable position
- Antecubital fossa: There are 3 main lines: Median cubital vein,
Cephalic vein and Basilic vein, see in Fig. below, to consider the drilling order in the order mentioned.
- There are 2 back veins: Metacarpal plexus and Dorsal venous arch.
- Black veins behind the feet
If unable to find a suitable vein in the Said position May choose a black collarbone.
(Subclavian vein) or groin vein (Femoral vein), which requires people with expertise.
Where to Avoid Blood Drawings
- the area that is scarred Thick tissue makes it difficult to penetrate.
- Areas with thrombosis vein, thick veins and wrinkles
- Areas with red marks or bleeding under the skin where the vein position is not clear, causing difficulty puncture
- The same arm as the chest undergoing surgery (Mastectomy). Blood draw will Makes the patient at risk of becoming infected Infection and sore pain for a long time because there is water If the need to penetrate must be treated.
Doctor’s consent
- The arm that made the AV shunt of the patient used for dialysis. Patients are at risk of infection.
- Intraveneous Fluid. Puncture of the arm from this arm will cause blood that is has been contaminated and results in incorrect analysis such as high Glucose, Hematocrit Low. If necessary, puncture the blood vessel in the area under the given position, stopping IV first. 2 minutes and should consult a doctor first.
Puncture blood vessels Using the Syringe method.
Equipment
- Needles and syringes size as needed. Normally use numbers 21, 22
2.Touniquet
- Cotton and alcohol disinfection
- Gloves
- Blood Collection Tubes Choose suitable for the test.
- Disc herniation of the blood
Drilling process
- The drill, wash your hands, wipe dry, wear gloves and prepare various tools to be ready for grab
Easily
- The drill questioned the patient’s name In which the patient has to give the name-surname (should not be called the patient’s name. Then ask if yes or not) and check the name and item on the inspection order May have to ask patients whether fasting came or not
- Have the patient sit down and place the arm on the arm support pillow in the supine position. Draped down and stretched straight
- The drill uses a rubber band over the piercing area 3 to 4 inches (tied into a loop, do not tie the knot to the end both sides can be easily removed) Tell the patient to hand (should not hold the arm for more than 1 minute if cannot proceed to the next step within 1 minute, loosen the strap first)
- Finding a location to drill Choose large blood vessels and see clearly.
- Clean and sanitize the pierced area using alcohol. Circle from the center, turn it out, let it dry. Don’t touch it again.
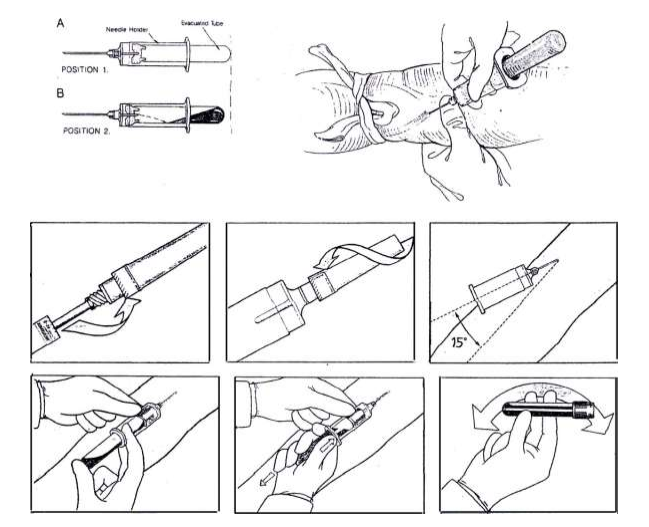
- Put the needle firmly onto the syringe. Pull the needle sheath Check piston by pulling piston in and out 1 time
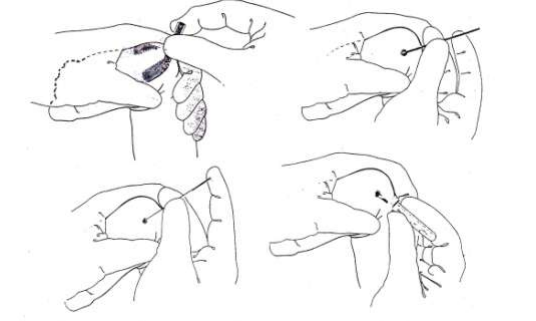
- Use your thumb One side pressed to pull the skin tightly in the area. Approximately 1 -2 inches more than the point of drilling the other hand grips the syringe and the prepared needle. Face the needle tip upward. Place the needle and syringe at an angle of 15-30 degrees with the arm in the same direction as the veins Pierce the needle through the skin into the veins. If the needle tip is in the at the right position, blood will flow into the syringe. To immediately release the armb and removed by pulling down below (Unless considering that disconnecting the armband may cause puncture failed, cannot puncture as needed)
- When the blood flows into the syringe Hold the syringe firmly, pulling the piston slowly. Until receiving the blood volume as needed (Try not to let the blood have bubbles)
- Remove the needle from the vein and cover the wound with a dry cotton pad for the patient to use with the other hand to hold the cotton swab wounds (patients should not have their hands folded in a cotton swab)
- The piercing rushes the blood to be inserted into the prepared blood vessels in order as in Figure (in the case of which requires multiple blood collection tubes according to the type of test)
– In the case of using a blood collection tube as a vacuum tube To pierce the needle through the rubber stopper to release allow the pressure to vacuum the blood into the blood vessels by itself Without having to push the cylinder when blood stops flowing into the blood vessels. Pull the needle from the rubber stopper. Do the same in the blood vessels.
– In the case of using a blood collection tube That is not a vacuum tube, open the tube, remove the needle from Syringes before injecting blood into the blood vessels by pushing the plunger, such as the blood vessels that have blue corks, Green, purple, gray etc. after putting blood into the blood vessels Turn the lamp upside down. 6 -8 times to ensure that blood is not clotting
- After the end of the blood transfusion into the blood vessels. Release the needle in a container or can. Throw the needle on the lid with a lock hole for releasing the needle. (Do not use the hand to put the needle back before discarding)
- Write the name and other details. Put on a sign attached to the side of the tube to put the blood while the patient is still the case Use the barcode to attach the barcode to the blood vessels in step 2.
- Inspect the patient’s arm If the bleeding stops Cover the wound with plaster (if any). Young children aged Under 2 years, do not need to cover with plaster, throw the cotton into a suitable container. After that, thank you.patient
- Take off your gloves and wash your hands once again at the end of the blood collection.
Puncture blood vessels The system was used by the Evacuated tube method to draw blood by blood.
Will be sucked into the blood vessels that are used to collect directly
Device
- Multisample needle
- Holder
- Various types of Evacuated tubes
- Touniquet
- Cotton and alcohol disinfection
- Disc herniation of the blood
- Gloves
Drilling process
- Perform the same procedure as for drilling using a syringe and needle in the pre-drilling step.
- Put the 2 ends of the needle into the Holder using the short side of the needle. (The side that has the needle cover And threaded), put it in the holder, turn clockwise until it is tight
- Remove the needle sheath Pull the skin taut and then pierce the needle in the same direction as the veins by angling. About 15 degrees to the skin
- Hold the holder firmly. Insert the artery with the rubber stopper into the holder while the hand is firmly pinned. Stabbed in the veins to not move The other hand attaches to the wing of the Holder with the index finger and middle finger. Use your thumb to touch the bottom of the blood vessels and push in with the needle wrapped in the tube through the rubber stopper of the tube. Blood vacuum If the needle is in the vein In the right position, the blood will be sucked in The blood vessels themselves.When the blood flows into the blood vessels, release the rubber band.
- When the first blood vessels have inflows up to the volume Determine and stop the flow to pull that artery Leave the holder while changing the blood vessels. Hold the needle firmly to prevent the needle from loosing. From the veins, then insert the next blood vessel according to The same sequence as drilling with syringes.
[Warning!] After drawing blood in a tube containing an anticoagulant Must turn the lamp up and down 6 – 8 times first. Will place the tubes in the tubes or collect the next tubes of blood
- Once you have the blood you need, pull the needle out, cover the wound with a dry cotton, wait for the blood to stop flowing, then Plaster
- Release the needle from the holder by using the reshield with the needle sleeve placed. Or release the lid of the can, discarding the needle Which has a lock to release the needle (should not use the hand to put the needle back before discarding)
- Skin Puncture
Indication in cases where small amounts of blood are needed or venipuncture cannot be pierced.
The right position
- fingertips
- Repeat the foot
equipment
- Gloves
- Lancet or blood collection tools
- Disinfecting alcohol
- Microhemacrit tube or small blood collection tubes
- Dry cotton or sterile gauze
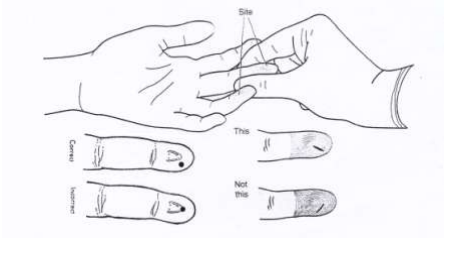
1. Finger Puncture is used in adults and children older than 1 year. Finger puncture (puncture) Is the ring finger and middle finger Both of these fingers cause less complications than other fingers. The piercing position isThe midpoint between the middle of the finger (the convex hill) and the side of the finger, with the incision perpendicular to the line Fingerprint as shown
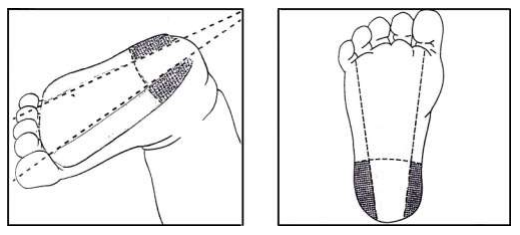
2. Heel puncture is used in newborns and children who have not yet started walking.
While drilling, must fasten the joints Stabilize the child’s feet. Do by using the index finger of the person doing it. Blood collection is done or placed directly on the arch of the foot. And thumb Place it away from the drilling area. The drilling position is on both sides of the foot, as shown in the picture.
Drilling process
- The first step is to do the same as puncture the veins.
- Use a cotton swab to disinfect alcohol to wipe the pierced area.
- Wait for the drilling area to dry, use lancet or drilling tools Penetrate the skin in the said direction Which causes the incision to be perpendicular to the finger or toe, about 2-3 mm deep, depending on the size of the patient Let the blood flow freely. [Warning!] Do not squeeze or press on the hard pierced area. Because it may cause red blood cells to break Or contaminated Tissues and fluids cause errors.
- Wipe away the first drop of cotton wool or gauze. And then continue to collect the drops of blood
- Use the hematocrit tube to place near the drop of blood to support the drip of the blood flowing out at an angle, allowing the blood to flow down the tube. May need to squeeze fingers or heels gently For the blood to flow like Continue until the blood is complete as needed. In the event that multiple blood samples are needed, order the blood collection as follows: 1. EDTA tube 2. Tube with additive 3. Tube with small red tube ( Serum tube for small blood vessels No. 1 and 2 must close the lid and shake upside down at least 8-10 times immediately to prevent the formation of small blood clots Can result in errors
Urine
There are many indications, depending on the purpose of each type of examination.
1. SINGLE SPECIMEN is a single urine collection divided into
1.1 Random urine, collected at any time Used to collect urine for routine tests such as U / A, sugar, protein and pregnancy.
How to store
- Have the patient to urinate at first and leave first. (The first part of the urine is responsible for removing internal contaminants. The urethra is thrown away)
- Use a clear, clean, dry, and wide-mouthed container to support the middle of the flowing urine for a volume of 30 ml.
- Urine at the end to be discarded
1.2 First morning urine, the first urine collection after waking up Which this urine is Urine that has been in the bladder for not less than 8 hours is more concentrated than other periods of urine. There is a greater chance of detecting pathological abnormalities, including nitrite and protein, storage and delivery methods. As in item 1.1 1.3 Fractional urine is a collection of urine for a set period of time, such as urine collection during the Glucose Tolerance test, which must be discarded before starting. The intake of glucose after a 2-hour urine collection again (if possible) how to store and transport. Same as 1.1.
2. CATHETERIZED SPECIMEN is the collection of urine by the catheterization method to let the urine flow out into the container, storage method and delivery as in 1.1.
3. TIMED SPECIMEN is urine collection during the specified time, such as urine for 24 hours, commonly used for chemical testing Or hormones that are excreted through the urine that is how much? The delivery of all types of urine samples Should deliver immediately Because the components of the urine begin to decay in 30 minutes at room temperature or within 4 hours when stored in the refrigerator 24 hour urine collection (24 hr. Urine)
How to store
- Set the start time And the last time And methods of storing the patient, for example, scheduled to be collected at 8:00 am on the day of collection Collected until 8:00 am the next day
- At 8:00 am on the day of first urination, discard first. 3. Begin to urinate the next time and keep every time with urination until 8:00 am the next day.
- At 8:00 am the next day, urinating for the last time and collecting this final urine
- Immediately deliver to the laboratory
Note: Because it takes a long time to collect urine, there may be spoilage, odor Needing treatment agents Condition and keep in the refrigerator
– Toluene uses 5-10 ml as a treatment for urine to detect urea, glucose, uric acid, amino acid.
– Boric acid uses 5-10 ml as a treatment for the urine to detect albumin, creatinine and hormones.
STOOL OR FAECES
equipment
- A wide mouth container of about 50 ml with a lid that can be opened and opened easily.
- Ashtray is a clean, flat wood.
How to store
- Have the patient to defecate into a clean container, such as a chamber pot
- Use a stick to remove the amount of fingertips Put the prepared container and close the lid. (If the stool has mixed flux Choose the area that has flux. Or the part that is suspected to be a parasite)
- Deliver with a completed transcript. Note: In the event that it cannot be delivered immediately, keep in the refrigerator temperature. 4 degrees celsius But if you want to check for a twisted organism, Giardia lamblia, Balantidium coli must be delivered immediately. Should not be stored in the refrigerator
Cerebrospinal fluid (CEREBROSPINAL FLUID)
Equipment for at least 3 sterile clean bottles Indication and storage method The doctor who punctures the spinal fluid will collect. In which, if sufficient quantity Should divide into bottles with numbers written as 1, 2 and 3 respectively Bottle 1 for testing for protein, sugar, Clinical chemistry lab and Clinical Immunology lab. Bottle 2 for Clinical Microbiology Lab Testing Bottle 3 for testing for cell count, cell differential (Hematology lab)
Delivery must be delivered to the laboratory immediately.
Fluid from different parts of the body (BODY FLUID)
Body Fluid: Pleural fluid, Peritoneal fluid (Ascites), Pericardial fluid, Synovial fluid etc.
Equipment and indications
- At least 3 vials or vials or 3 ampoules with appropriate anticoagulant according to Test type
- Needle punched with syringe
- Equipment and reagents used to kill germs
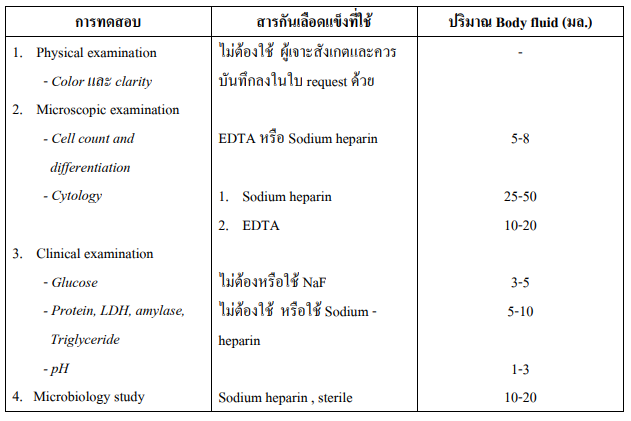
How to store The medical treatment will be collected by aseptic technique by putting the body fluid into a bottle or tube. Blood is based on the type of test required. As detailed in the table below. Delivered to the laboratory immediately.
Table showing test types Anticoagulant and amount of Body fluid used